Do you want to make a revision to one of our exercises or create an entirely new one? If so, read on to learn how!
Creating New Exercises
Unlike with articles where we encourage you to contact us first, we're very open to exercise submissions, since even if they do not fit within a lesson, they can still be of use to students as supplemental practice material or shared with other studiers outside of our website. We typically accept exercises into the user-submitted exercise list that are beneficial to our students' studies. However, if the exercise submitted is exceptional and would fit into one of our lessons, we'll adopt it into our main course.
For creating exercises, you'll require a basic understanding of the following:
- Japanese (at least N4)
- HTML
Knowing Japanese is very important to ensure that your exercise is using proper Japanese and not providing students with erroneous answers or problems. HTML is required mainly for written exercises and is used lightly within Vocabulary (example sentences), and moderately within Multiple Choice. So if you know both of those you should be good to go!
Click here to learn how to use our Exercise Editor so that you can start creating your exercise!
Revising Exercises
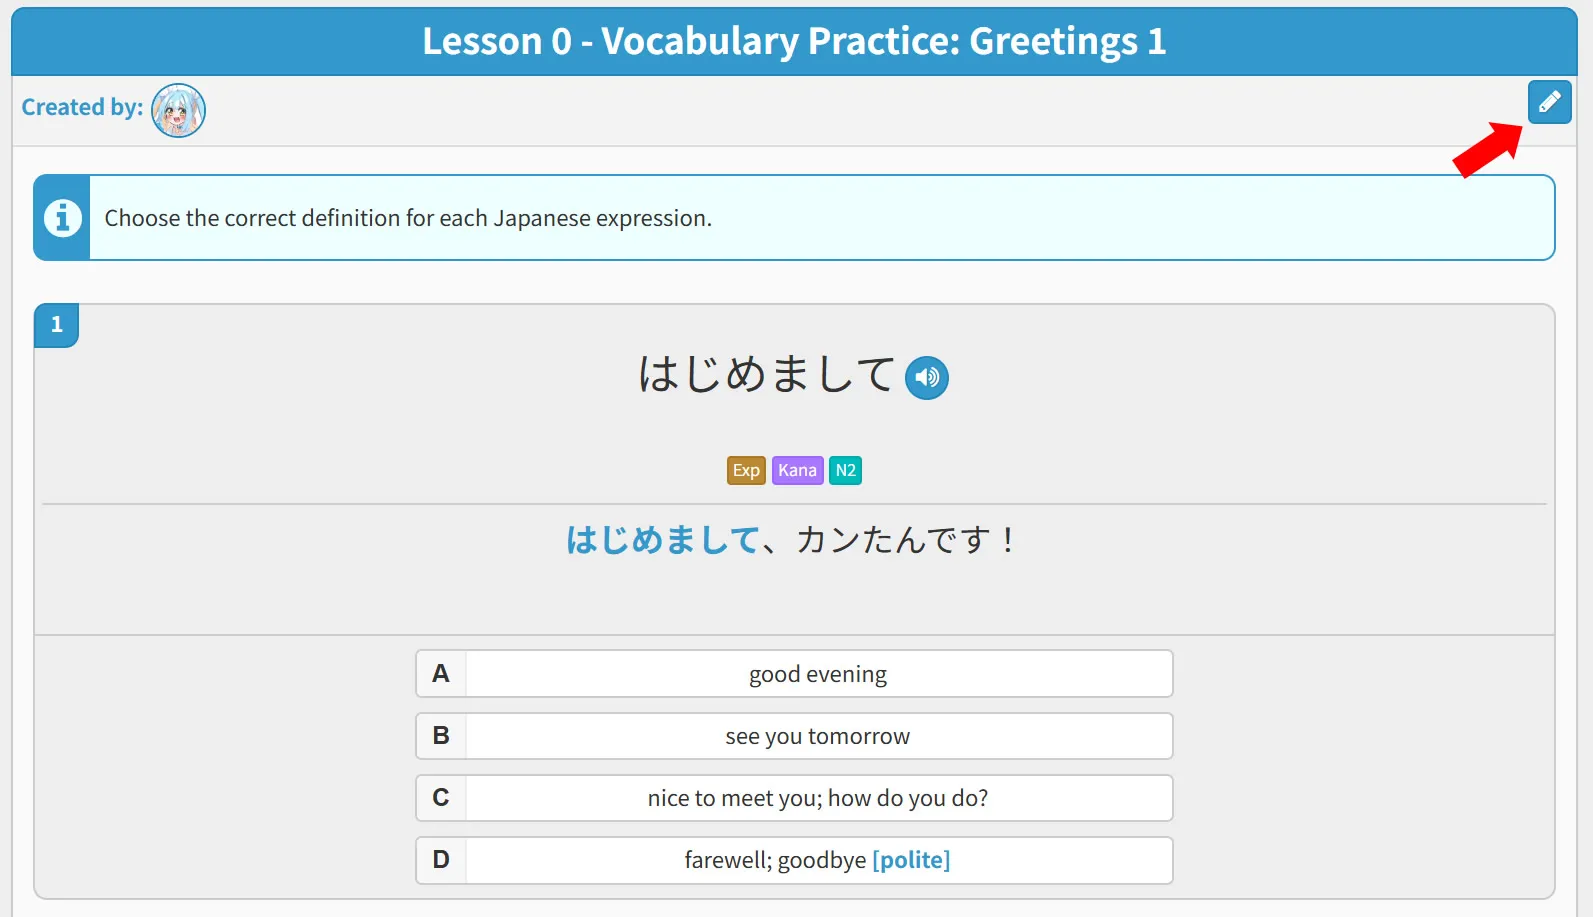
If you notice a typo or would like to tweak to an exercise, click the button in the top right corner of the exercise to edit it. This will open the exercise in our editor. If you're new to our Exercise Editor, please see the next section below to learn how to use it!
How to Use the Exercise Editor
Before you create or edit any exercises, let's get you familiar with our Exercise Editor! For creating and editing exercises on Kantan Japanese, we have a dedicated editor that you can use. Click the button below to open it up! You can also click the button in the top right of exercises to open them in the editor.
If you prefer it, you can also use our old legacy exercise editors:
The exercise codes generated by these tools can also be submitted to GitHub.
Exercise Editor Layout
You should see something like the image below once you've opened the Exercise Editor.
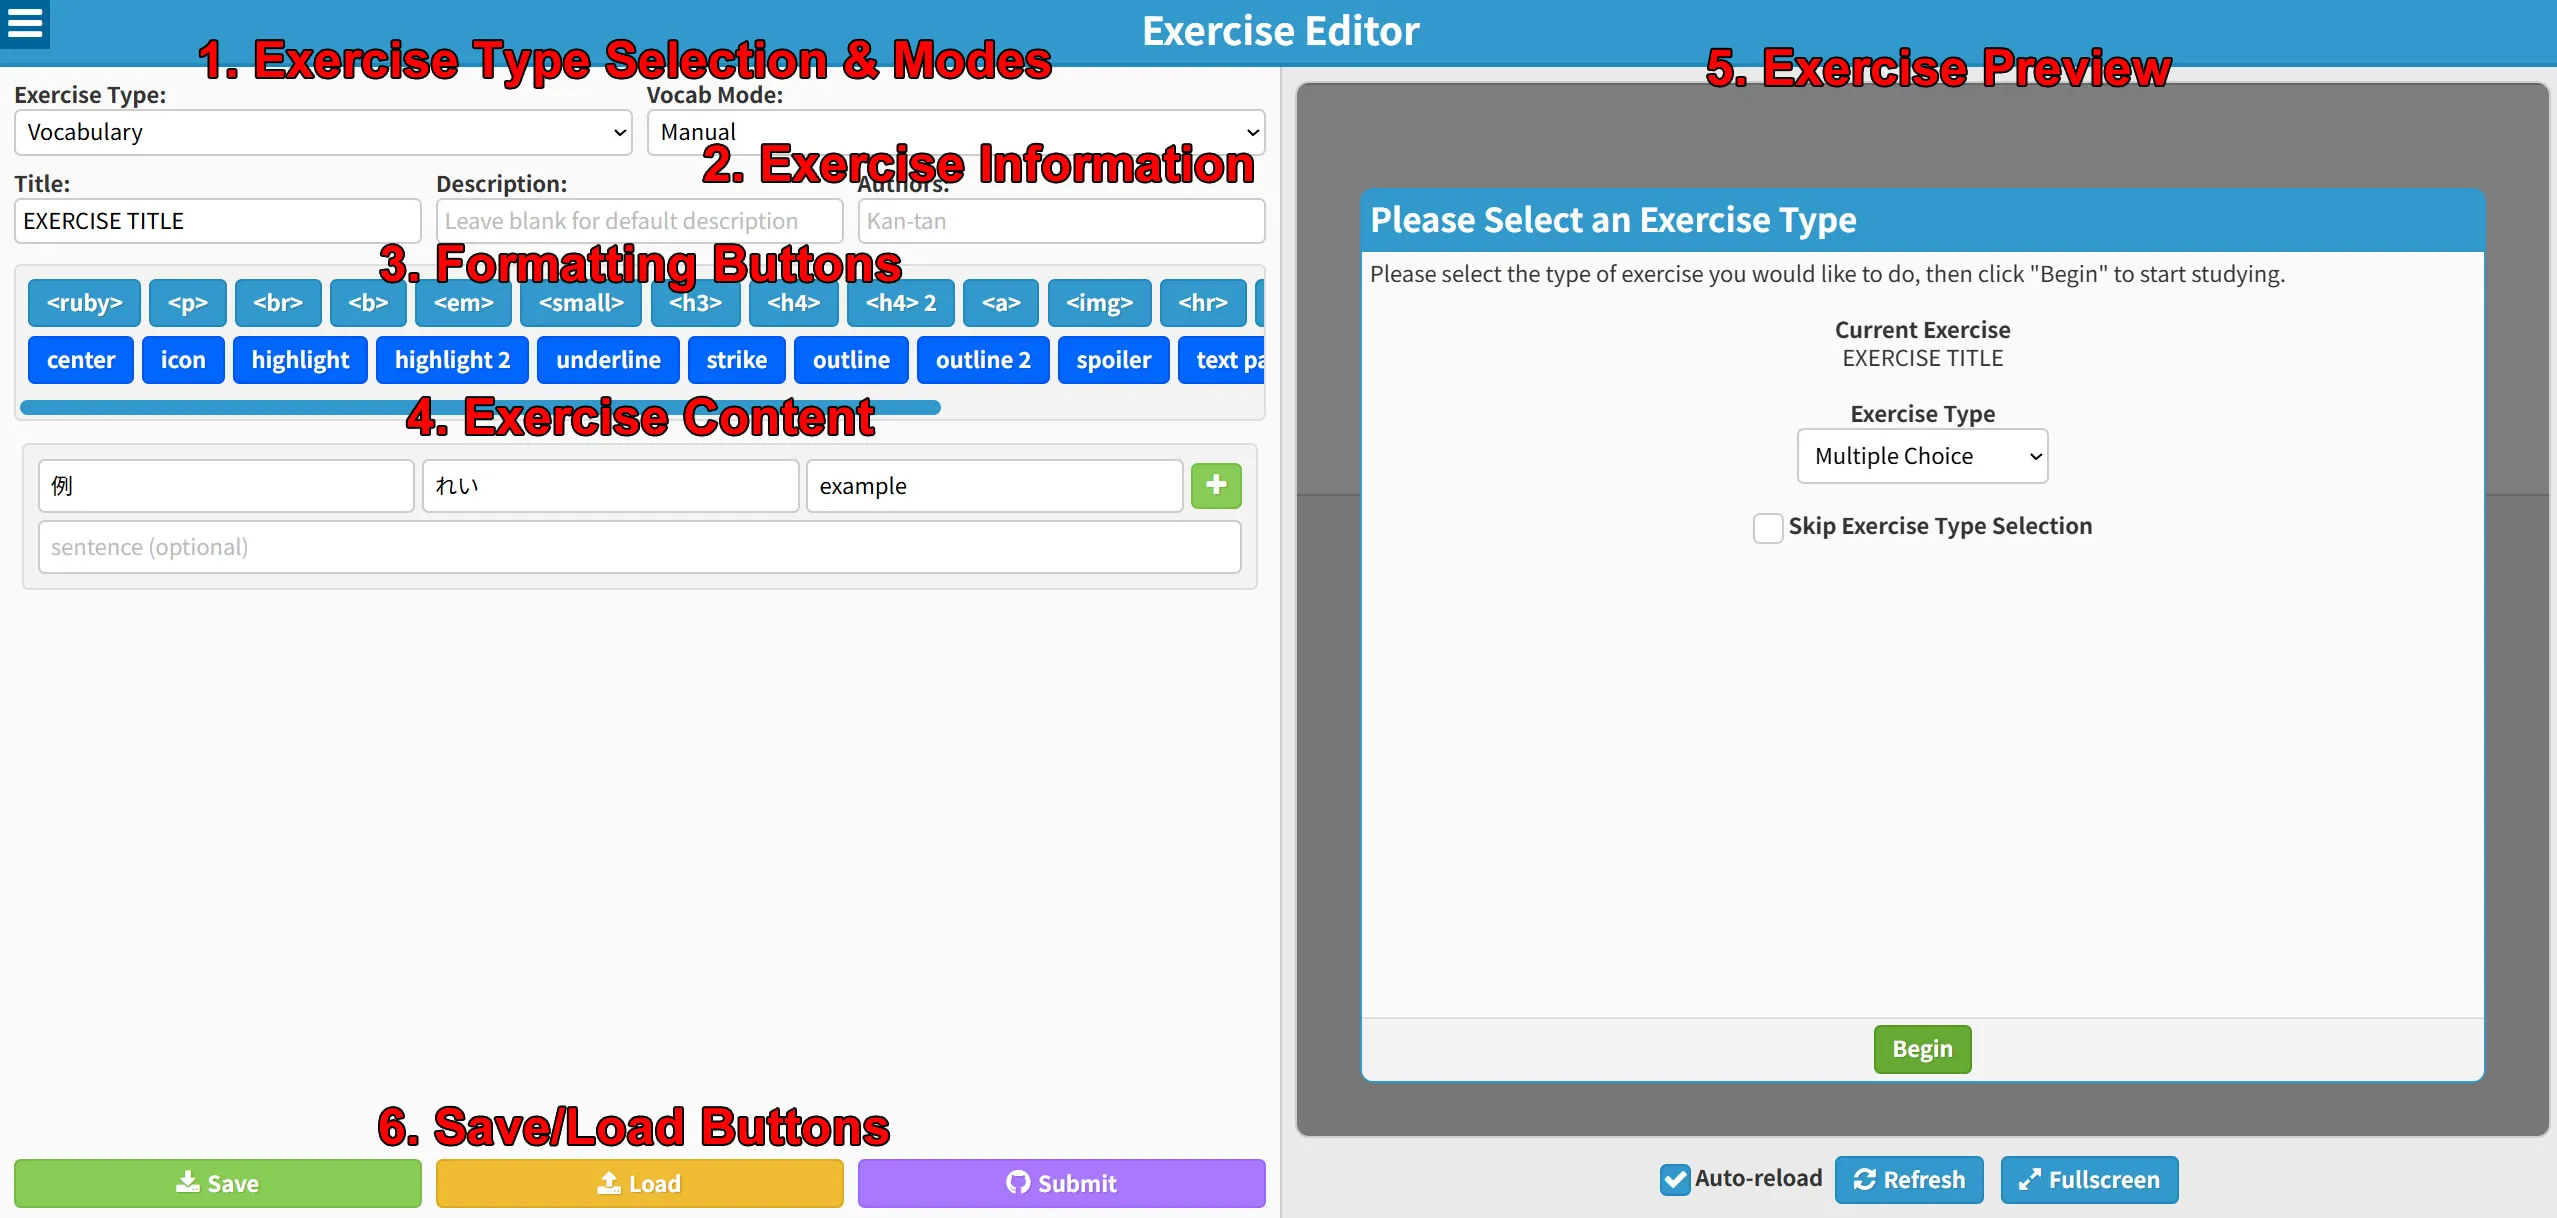
- At the top you can select the type of exercise you want to create, which ranges from Vocabulary to Written Quizzes. For some types, there is also a mode selection drop down that lets you chose from manual exercise creation where you fill out everything yourself, to preset exercise creation where you select words from a list to form an exercise.
-
This area consists of the exercise's meta data, such as the page title, description, and authors.
- Title: Here you would insert the title for your exercise. Try to make it relevant to what your exercise makes someone practice, such as a grammar point, category of words, etc.
- Description: The description gives the student a general idea of what they should do in your exercise and is usually shown at the top of the page. By default, if left blank, it will show a generic message based on the exercise type. If you need to give students special instructions for an exercise, write them here!
- Authors: This is where the list of authors for an exercise goes. Normally there's only one, but if someone makes considerable contributions to an exercise we will add them to the list. Multiple authors should be separated by a comma, like so:
Seth, Kan-tan, Mishy. If you're creating your very own exercise, make sure to sign your name here!
- This is the toolbar used for inserting HTML formatting elements (Please see this website if you're new to HTML). For Vocabulary Exercises, we mainly use these elements in the example sentences, such as applying a highlight for keywords and 振り仮名 for kanji. Multiple Choice can also make use of HTML formatting for furigana and other things. Where you'll be using these buttons the most, however, is Written Exercises as they are built entirely with HTML.
- This is where you will build your exercise! The UI changes depending on the exercise type, but generally, Vocab, Kanji, and Multiple Choice all use a similar form-based UI where you can fill things in. Written Exercises on the other hand are more advanced and just have a big textarea for inserting HTML and quiz elements from our toolbar.
- To the right is a big preview of what your exercise will look like. As you type, it will automatically update. In some instances, such as when editing written exercises, the auto-reload might interfere with editing, so you can turn it off by clicking the Auto-reload checkbox at the bottom of the preview and use the manual refresh button instead. Also, if you need to get a better look at the preview, click the Fullscreen button below it to switch to the fullscreen preview mode.
-
When you're finished or want to take a break, click the Save button (or press
CTRL+S) to save your progress. You can also use the Load button (or drag and drop the HTML file into the textarea) to load an exercise into the editor. If you're ready to submit your exercise to GitHub, click the Submit button which will take you to our instructions for submitting your exercise/revisions to GitHub.
※ Please note that the file does NOT have to be named index.html. You can name it whatever you like, but remember to keep the.htmlextension.
Saving Progress
When using the Exercise Editor, your progress can be saved in two ways:
- Whenever you type in the editor, your progress is saved automatically to the browser. Please note, however, that if you edit another exercise, your currently saved exercise will be overwritten. So make sure to manually save the exercise you were working on using the method below!
- You can manually save exercises locally to your computer by clicking the Save button or by pressing
CTRL+S. This will download an HTML file that you can load into the editor at any time. Try to make a habit of manually saving your progress with this button every so often whenever you're working on exercises so that you don't lose your progress!
The HTML file output by the Save button is also how you will send us your exercise or revisions. So always remember to save your exercise when you're finished with it. By default, if no title is written, the file name will be index.html. While this is fine, it's a good habit to name it something memorable so that you don't overwrite it by accident and know what the contents of the exercise are at a glance.
Vocabulary Exercise Layout
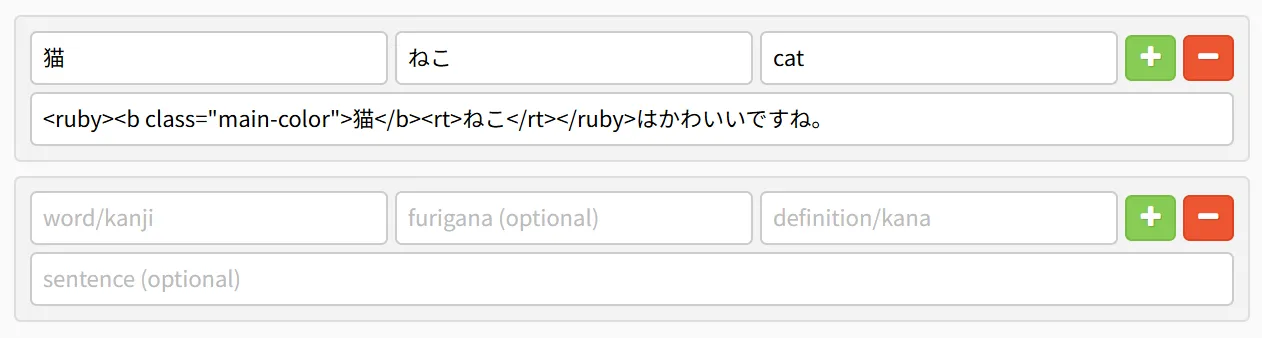
The layout for Vocabulary exercises is pretty straightforward. Each block is one vocab item, and inside each block are fields that you can fill out. These fields are:
- word/kanji: Here you would put the kanji version of a word, such as 猫. If the word you want to add has no kanji, you can place it here as well.
- furigana: These are the helper texts for the previous field. If what you wrote previously was kanji, you can write the hiragana version for the word here, such as ねこ. If the word you put in the first field was already hiragana, you can leave this field blank.
- definition/kana: Here you can place the English (or other language) definition of the word, such as "cat" in the example above. If you are instead matching the kanji to it's kana, you can put the hiragana for the word here instead, such as ねこ.
-
sentence: In this field you can optionally include an example sentence for your vocabulary item. You can create sentences yourself or look for example sentences, such as the ones on Tatoeba. Additionally, if you want to stylize your example, you can highlight the main word for your vocab items using our highlight tags
<b class="main-color"></b>which gives the following result:猫はかわいいですね。
Aside from this, you can add new items by clicking the + button or remove items by clicking the - button. That's pretty much all there is to manually creating vocabulary exercises!
Using Preset Mode
If you'd like to create a vocabulary exercise using our existing vocabulary, such as for personal use, you can do that by switching to the Vocab Mode drop down at the top of the editor from Manual to Preset.
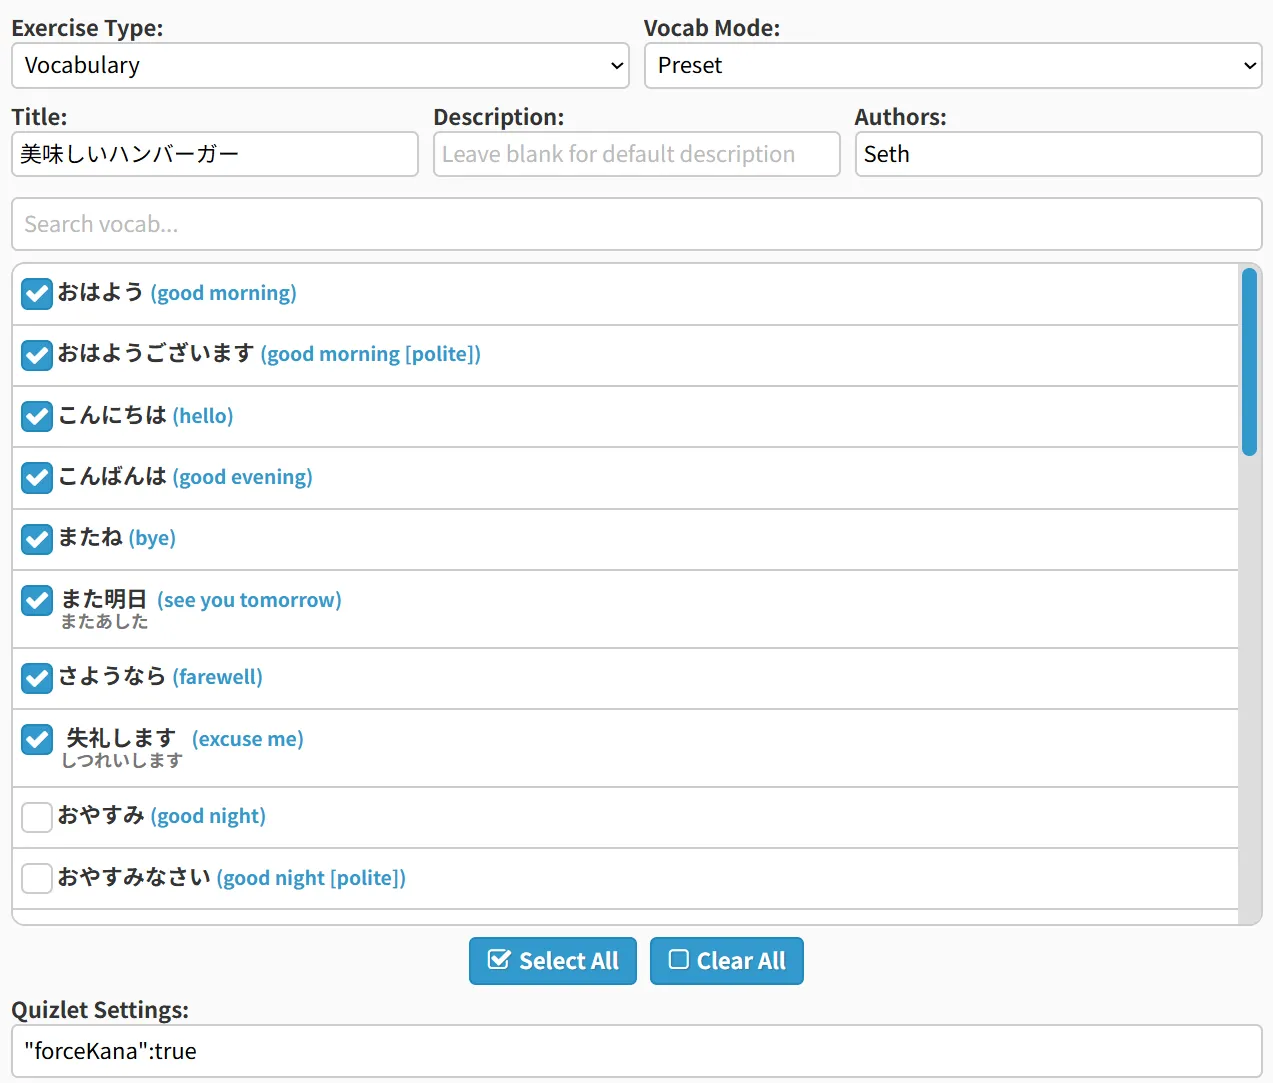
In preset mode, you can select words you want to study by clicking and marking them in the vocabulary list. And if you're looking for a specific word, you can use the search bar above it. Below the list is buttons to select or unselect all items.
Last but not least, there is an input at the very bottom for the Quizlet Settings. These are more advanced, optional, settings that alter how the vocabulary is generated. The following options are available:
forceKanasetting this option totrueremoves all usage of Kanji, meaning that the vocab renders only using Hiragana or Katakana.forceKanjisetting this option totrueforces words that wouldn't normally be written in Kanji to use their Kanji variants, if available.maxMeaningsthis setting takes a number from 1-99. It is used to reduce the amount of meanings shown for a word. So, if you only want to see one meaning, set the value for this option to1.swapExamplessetting this option totrueswaps the example sentences that are initially shown. By default, the English example sentences are shown first, but if this option is set totrue, it will show the Japanese example sentences first.
If you want to include more than one of these options, you can chain them together using a , like so: forceKana : true, maxMeanings : 1, swapExamples : true. Try experimenting to see what works for you!
Kanji Exercise Layout
Just like the vocabulary layout, the Kanji exercise layout lets you create Kanji-oriented exercises by filling out the input fields. There are three types of Kanji exercises or "modes" that you can select from the Kanji Modes drop down, plus presets:
-
Kanji Meanings (Manual)

This mode is used to create Kanji exercises that focus on testing students' knowledge of Kanji meanings. There are two fields for each block:
- Kanji: Here you would place the Kanji you want to test a student on, such as 猫.
- Meanings: Here you would place the meanings for the Kanji. When doing a Kanji Meanings exercises, these will serve as the multiple choice answers.
-
Kanji Readings (Manual)
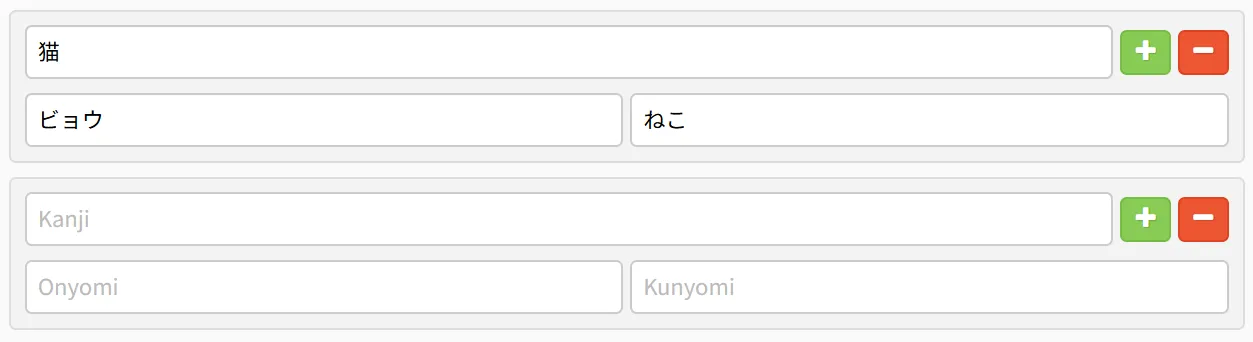
This mode is used to create Kanji exercises that focus on testing students' knowledge of Kanji readings. There are three fields for each block:
- Kanji: Here you would place the Kanji you want to test a student on, such as 猫.
- Onyomi: Here you would place the Onyomi (Chinese readings) for the Kanji.
- Kunyomi: Here you would place the Kunyomi (Japanese readings) for the Kanji.
Both Kunyomi and Onyomi will be used as answers in multiple choice.
-
Kanji Stroke Order (Manual)
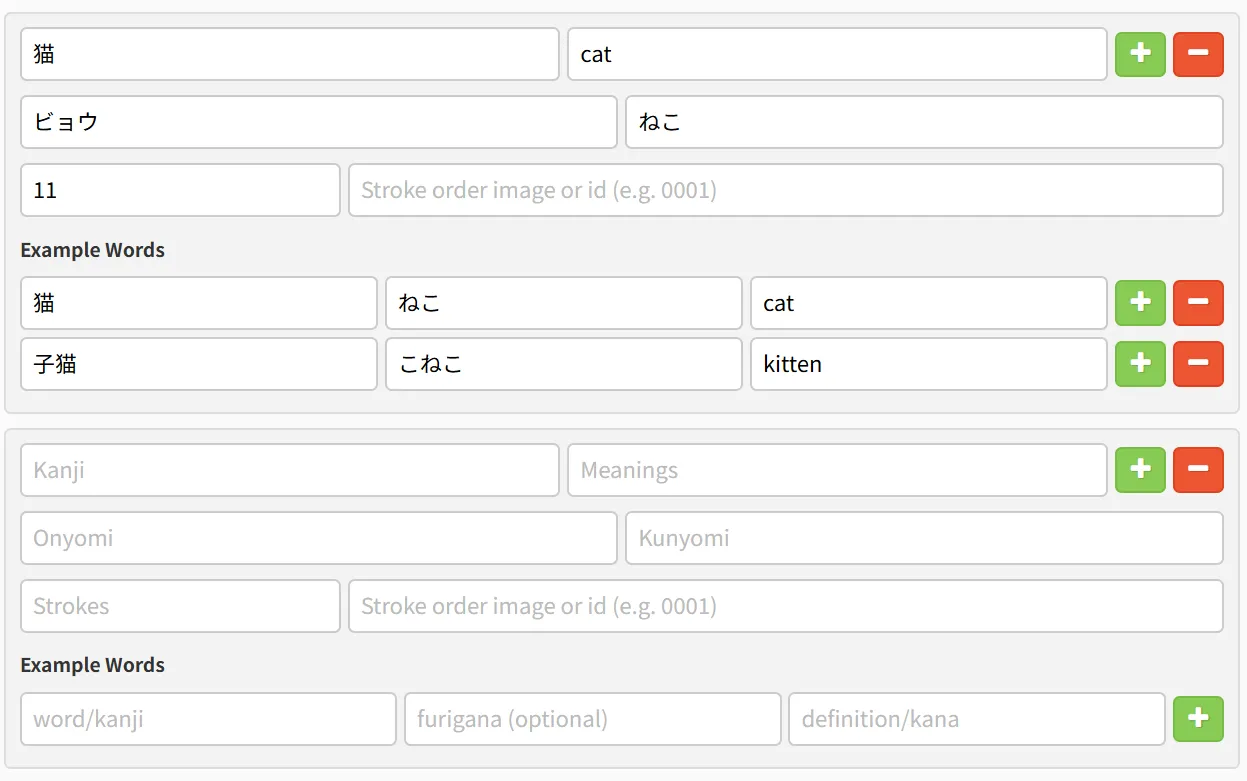
This mode is used to create Kanji stroke order exercises that focus on testing students' knowledge of writing Kanji while also showing additional information to help further reinforce meanings, readings, and so on. There are six fields for each block + example word fields:
- Kanji: Here you would place the Kanji you want to test a student on, such as 猫.
- Meanings: Here you would place the meanings for the Kanji.
- Onyomi: Here you would place the Onyomi (Chinese readings) for the Kanji.
- Kunyomi: Here you would place the Kunyomi (Japanese readings) for the Kanji.
- Strokes: Here you would place the amount of strokes a Kanji has. For 猫 that would be 11.
- Stroke order image or id: Here you would place the image for the stroke order or one of our preset images which start at 0001. You can find images to use for the stroke order here.
※Please note that for the stroke order to be recognized, it must be available in
resources/javascript/patterns/kanji.js. If a Kanji you've drawn is NOT recognized, please feel free to contact us so we can add it. -
Kanji Presets
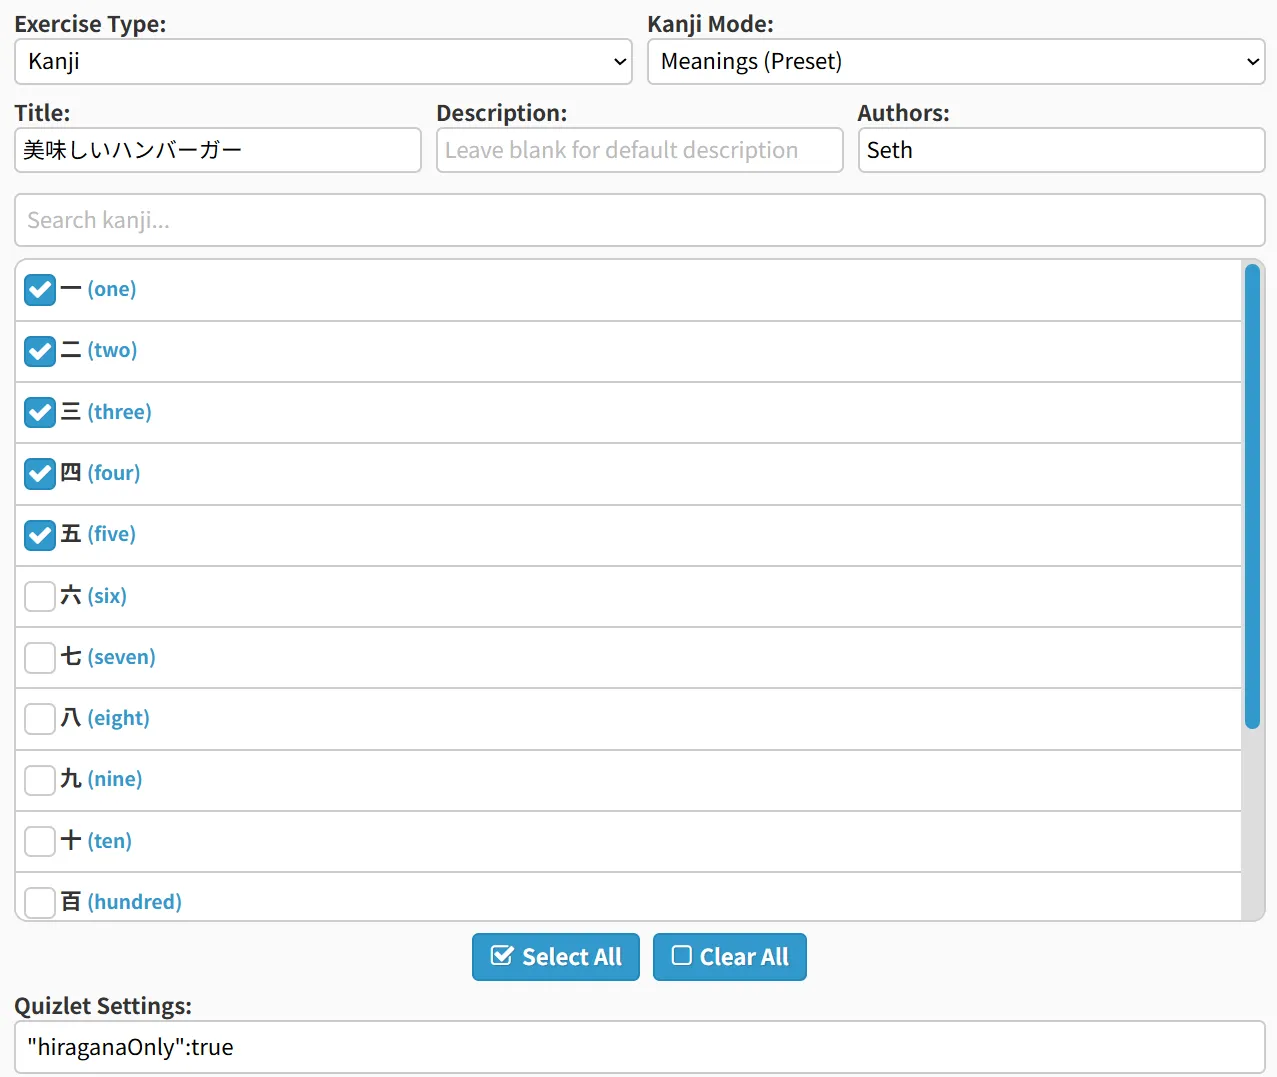
The preset mode for the kanji exercises function the exact same way as the vocab presets. In this mode, you can select Kanji you want to study by clicking and marking them in the Kanji list. And if you're looking for a specific Kanji, you can use the search bar above it. Below the list is buttons to select or unselect all items.
Last but not least, there is an input at the very bottom for the Quizlet Settings. These are more advanced, optional, settings that alter how the Kanji is generated. The following options are available:
hiraganaOnlysetting this option totrueremoves all usage of Katakana from our Onyomi readings. Useful for those not familiar with Katakana yet.
Currently that is all. If you would like to suggest a new option, feel free to contact us.
Multiple Choice Exercise Layout
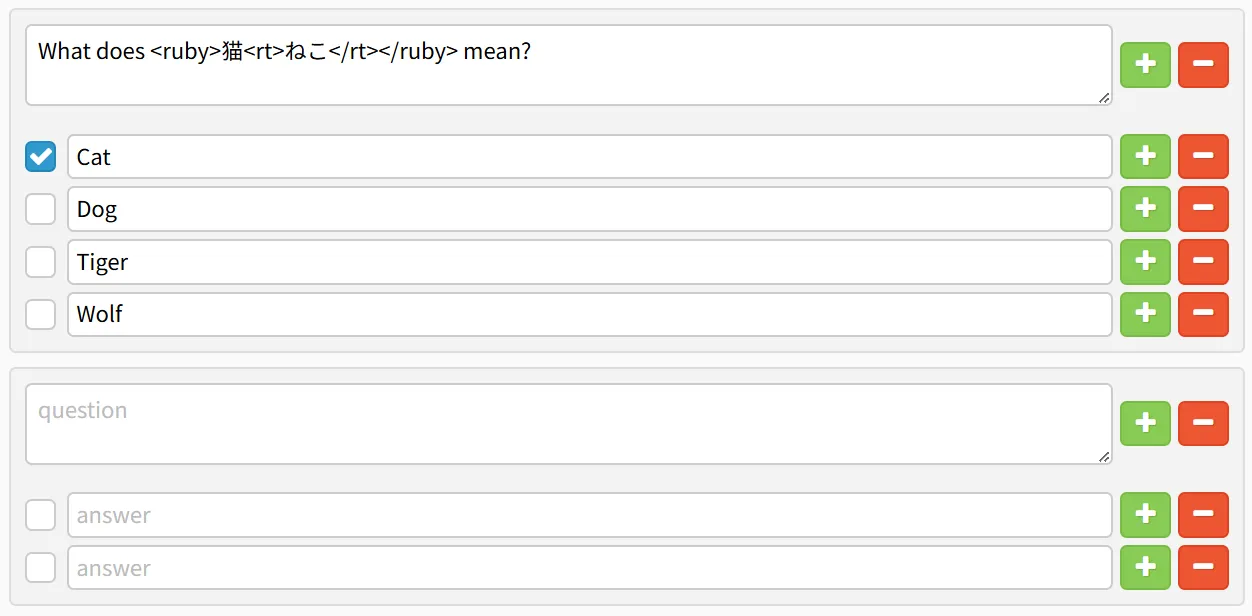
The layout for Multiple Choice exercises is just like the others. Each block contains a question and answer field.
- question: Here you would write the question for students to answer. You can use plain text or a mix with HTML should you wish to stylize your question's contents. In regards to questions in Japanese, we typically wrap Kanji in
<ruby><rt></rt></ruby>tags to include Furigana to help students who don't know how to read certain Kanji. - answer: Here you would write the real answer to the question along with multiple erroneous answers. Make sure to use the checkbox to the left of the input field to mark the answer as correct. If you wish, you can have more than one correct answer. HTML is also supported in these fields if you need to annotate Kanji with ruby tags, embolden text, and so on.
Last but not least, at the top, next to the Exercise Type drop down, you may have noticed an additional option: Bundle with Written Quiz. Checking this option does exactly as it says: it will bundle it with whatever Written Quiz you currently have in the Exercise Editor and vice versa when you save the exercise file.
This option makes it possible for students to choose between two exercise types when they do your exercise: Multiple Choice or Written. It can be good to do this if you wish to provide students with additional ways to practice the same grammar point and other material.
Written Exercise Formatting
Written Exercises are formatted using HTML. If you're not familiar with HTML, you can learn about it here. Our formatting is pretty simple and straightforward overall though, so even if you don't know HTML you can get by just fine using the formatting buttons in our editor. Here are some tips for formatting Written Exercises:
-
Start the quiz or each section of a quiz with a description block (buttons desc and desc 2) that tells the student what to do.
- desc inserts
<p class="sectionDesc"><i class="sectionArrow fa"></i>DESCRIPTION</p>which is a generic description block with an arrow. It's ideal for exercises with only a single section. If you'd like to use another icon besides the arrow, you can insert it inside the sectionArrow tag by using the icon button. - desc 2 inserts
<p class="sectionDesc"><i class="sectionNumber"></i>DESCRIPTION</p>which is a numbered description block. It's ideal for exercises with multiple sections. While you can manually insert a number inside the sectionNumber tag, it should automatically number each section for you.
- desc inserts
- After the description, create a set of problems by using the problem set button. This will insert a section that automatically numbers any
class="problem"blocks inside of it, along with adding a few preset problems for you to work with or delete. - To add new problems to a problem set, simply click the problem button and it will insert a standard problem.
-
To insert additional answer fields within a problem, use the answer buttons. There are three different types:
- answer inserts our standard answer field
{ANSWER|HINT}. ANSWER is where you insert the answer for the problem and HINT is where you can optionally include a hint. If you don't need to include or don't want to include a hint, simply delete|HINT. - answer 2 inserts our multiple answer field
{ANSWER1|ANSWER2|answer;hint:HINT}. This one allows you to enter 2 or more answers manually by separating each answer with a|. Theanswerflag is what tells our generator that this problem has multiple answers. Additional flags are separated by;, such as thehintflag, which tells our generator to add a hint to this problem. If you don't want any hints, simply remove the hint flag and the;. - answer 3 inserts our more complex answer field
{これは例文ですよ|これはれいぶんですよ|[alts:{これ}は{例文}です{よ}。|コレ|れいぶん|]answer;hint:This is an example sentence}. The[alts:{AN}{SWER}|REPLACEMENT1|REPLACEMENT2]field inside this problem is used for generating multiple alternative answers and is primarily meant to help make mixed kanji/kana answers more flexible.{AN}{SWER}is where you would place your initial answer. You would then wrap words or kanji with{}. Once wrapped, you can specify alternatives for these words or kanji by placing them whereREPLACEMENT1andREPLACEMENT2are. Of course, you can add as many replacements as you want by separating each one using a|, but remember that the replacements only correspond to the position of each{}.
- answer inserts our standard answer field
-
If you want to insert alternative sub-answers for an answer field, use the subs button. This will insert
%(ANSWER1/ANSWER2)which will allow you to insert additional sub-answers within an answer. One such case is when using この/その/あの:{%(この/その/あの)猫}This field makes it possible to answer the problem by using この猫、その猫、or あの猫. Lastly, if you want to make the sub-answers optional, simply leave one of the sub-answers blank, like this:
%(この/). Only one of these can be used per answer, so use them wisely. If you need more flexibility, use the alts button (see answer 3 above). - You can exclude problems from the quick answer checker, by wrapping them in
<span class="no-checking"></span>tags or applying this class to their parent tags. - You can also exclude problems from easy mode, by wrapping them in
<span class="no-easy-mode"></span>tags or applying this class to their parent tags. To exclude both, simply include both classes:<span class="no-checking no-easy-mode"></span>. - Use
<div class="columns-2 clear"><div>COLUMN1</div><div>COLUMN2</div></div>and put problems in COLUMN1 or COLUMN2 to display them side by side. - You can use
<div class="sub-section"></div>to add contrast between sections. It creates a block with a white background. - If you're planning to write a lot of text that's going to be read, it's best that you use
<div class="sub-section text-passage"></div>, as it increases the size of the text making it more readable. - If you're creating a text-passage for vertical text, use
<div class="sub-section text-passage vertical-text"></div>instead. - Use
<br>or<hr>to add spacing or separation between sets of problems or answers. - Links can be inserted by using the
<a href="URL">LINK TEXT</a>tags and place your link where URL is. You can optionally open a link in a new tab by adding thetarget="_blank"attribute after href but before the closing ">". -
Images can be inserted by using the
<img class="lightbox" src="IMAGE_URL">tag and placing your image link where IMAGE_URL is. You can optionally control the size of the image with thewidth="NUMBER"attribute by putting a number such as 100 where NUMBER is. Thelightboxclass enables images to be opened in our popup window. This class also adds a border around the image, so if you don't want that, change the class toclass="lightbox no-border"to remove the border.
All of our images are hosted locally in the repo, so you can also include these images by referencing a file from../../../resources/images/. If you're embedding an image outside of our repo, you can use a host like imgur to include your images. We'll later import these images into our repo so that they can be viewed in our offline version. - Additionally, you can use
{!IMG|bag.jpg}to insert images stored in ourresources/images/exercisesfolder. Simply replacebag.jpgwith whatever file you like from this folder.
Input Answer Zones
As you might've seen above, out Input Zones for Answers are created using a format like this: {ANSWER|ANSWER2|answer}. At the end is a flag, answer, which tells the generator this input zone has two answers. Flags change the functionality of each input zone, and there's quite a few of them that you can use:
- answer: The answer flag lets you specify two or more problems separated by a
|.{ANSWER|ANSWER2|answer} - hint: The hint flag adds a small hint or cue underneath the problem.
{ANSWER|ANSWER2|answer;hint:HINT} - width: The width flag specifies a custom width for the problem. This can be 100, 1000, or more. Normally this is not needed since width is calculated automatically, and is mainly used for if you want to make the problem sizes uniform.
{ANSWER|ANSWER2|answer;width:500} - furigana: The furigana flag specifies furigana to be shown for an answer at the end of a quiz.
{ANSWER|ANSWER2|answer;furigana:answer} - placeholder: The placeholder flag displays placeholder texts for a problem.
{ANSWER|ANSWER2|answer;placeholder:Write your answer here} - spoiler: The spoiler flag is used in tandem with the hint flag to hide the hint until it is hovered over, like this.
{ANSWER|ANSWER2|answer;hint:hidden;spoiler} - segment: Manually sets the segmentation mode for this problem when Easy Mode is enabled. Possible values are
word(splits words) andgrapheme(splits everything). By default, Easy Mode tries to determine what suits a problem best, but in rare cases it may split things that we don't want split and that's where this flag comes in to help.{ANSWER|ANSWER2|answer;segment:word} - exclude: Manually removes words from our segmentation dictionary for this problem when Easy Mode is enabled. Each word can be separated by a
,.{何でもできる|何でもできる|answer;exclude:何でも}
Multiple flags can be used by separating each one with a ;.
Multi-Selection Answer Zones
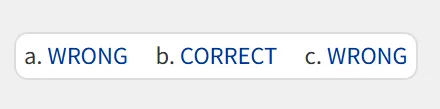
In addition to standard input zones where you write text, we also have some more interactive input zones, such as the multi-selection zone. This zone is a bit similar to multiple choice in that you can provide a selection of answers to choose from, but only one correct answer. You can insert this zone into a quiz by using the multi field button or by copying and using the code below.
{CORRECT|!MULTI:WRONG/CORRECT/WRONG|spacer:alpha}
This field works in the following manner:
- The first instance of CORRECT is the answer for this field.
- !MULTI: is where you will place your multiple answers, with each answer separated by the special full-width Japanese
/. Ensure that the correct answer matches the answer in 1. above. The rest of the answers should be incorrect. -
spacer: is a flag that tells our generator what kind of separator should be used for the answers.
- alpha: separates the answers by a., b., c., etc.
- numeric: separates the answers by 1., 2., 3., etc.
- character: insert any character after the
:such as・to separate the answers by this character. - default: by default, if spacer is not specified, the answers are separated by
/.
- nobg: this is an additional flag that you can include after spacer (and separated by a
;) to remove the background and container for the multi-selection zone. This is useful for if you want to embed the multi-selection zone in a sentence and such.
Underline Answer Zones
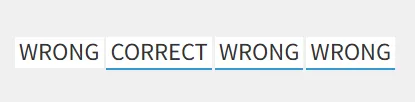
The last special type of input zone we have is the underline field. This has a student underline a specific portion of a sentence, such as identifying where a noun phrase begins and ends. The underline starts from the far right and extends to the far left. You can insert this field into your quiz by using the underline field button or the code below.
{!UNDERLINE|WRONG|[A]CORRECT|WRONG|WRONG}
This field works in the following manner:
- !UNDERLINE tells the generator that this field should be formatted as an underline field.
- Answers or "chunks" of the sentence are separated by
|. - [A] marks the correct answer and underline range. This means that WRONGCORRECTWRONGWRONG will be fully underlined if the correct answer is selected.
Kantan Chat Layout
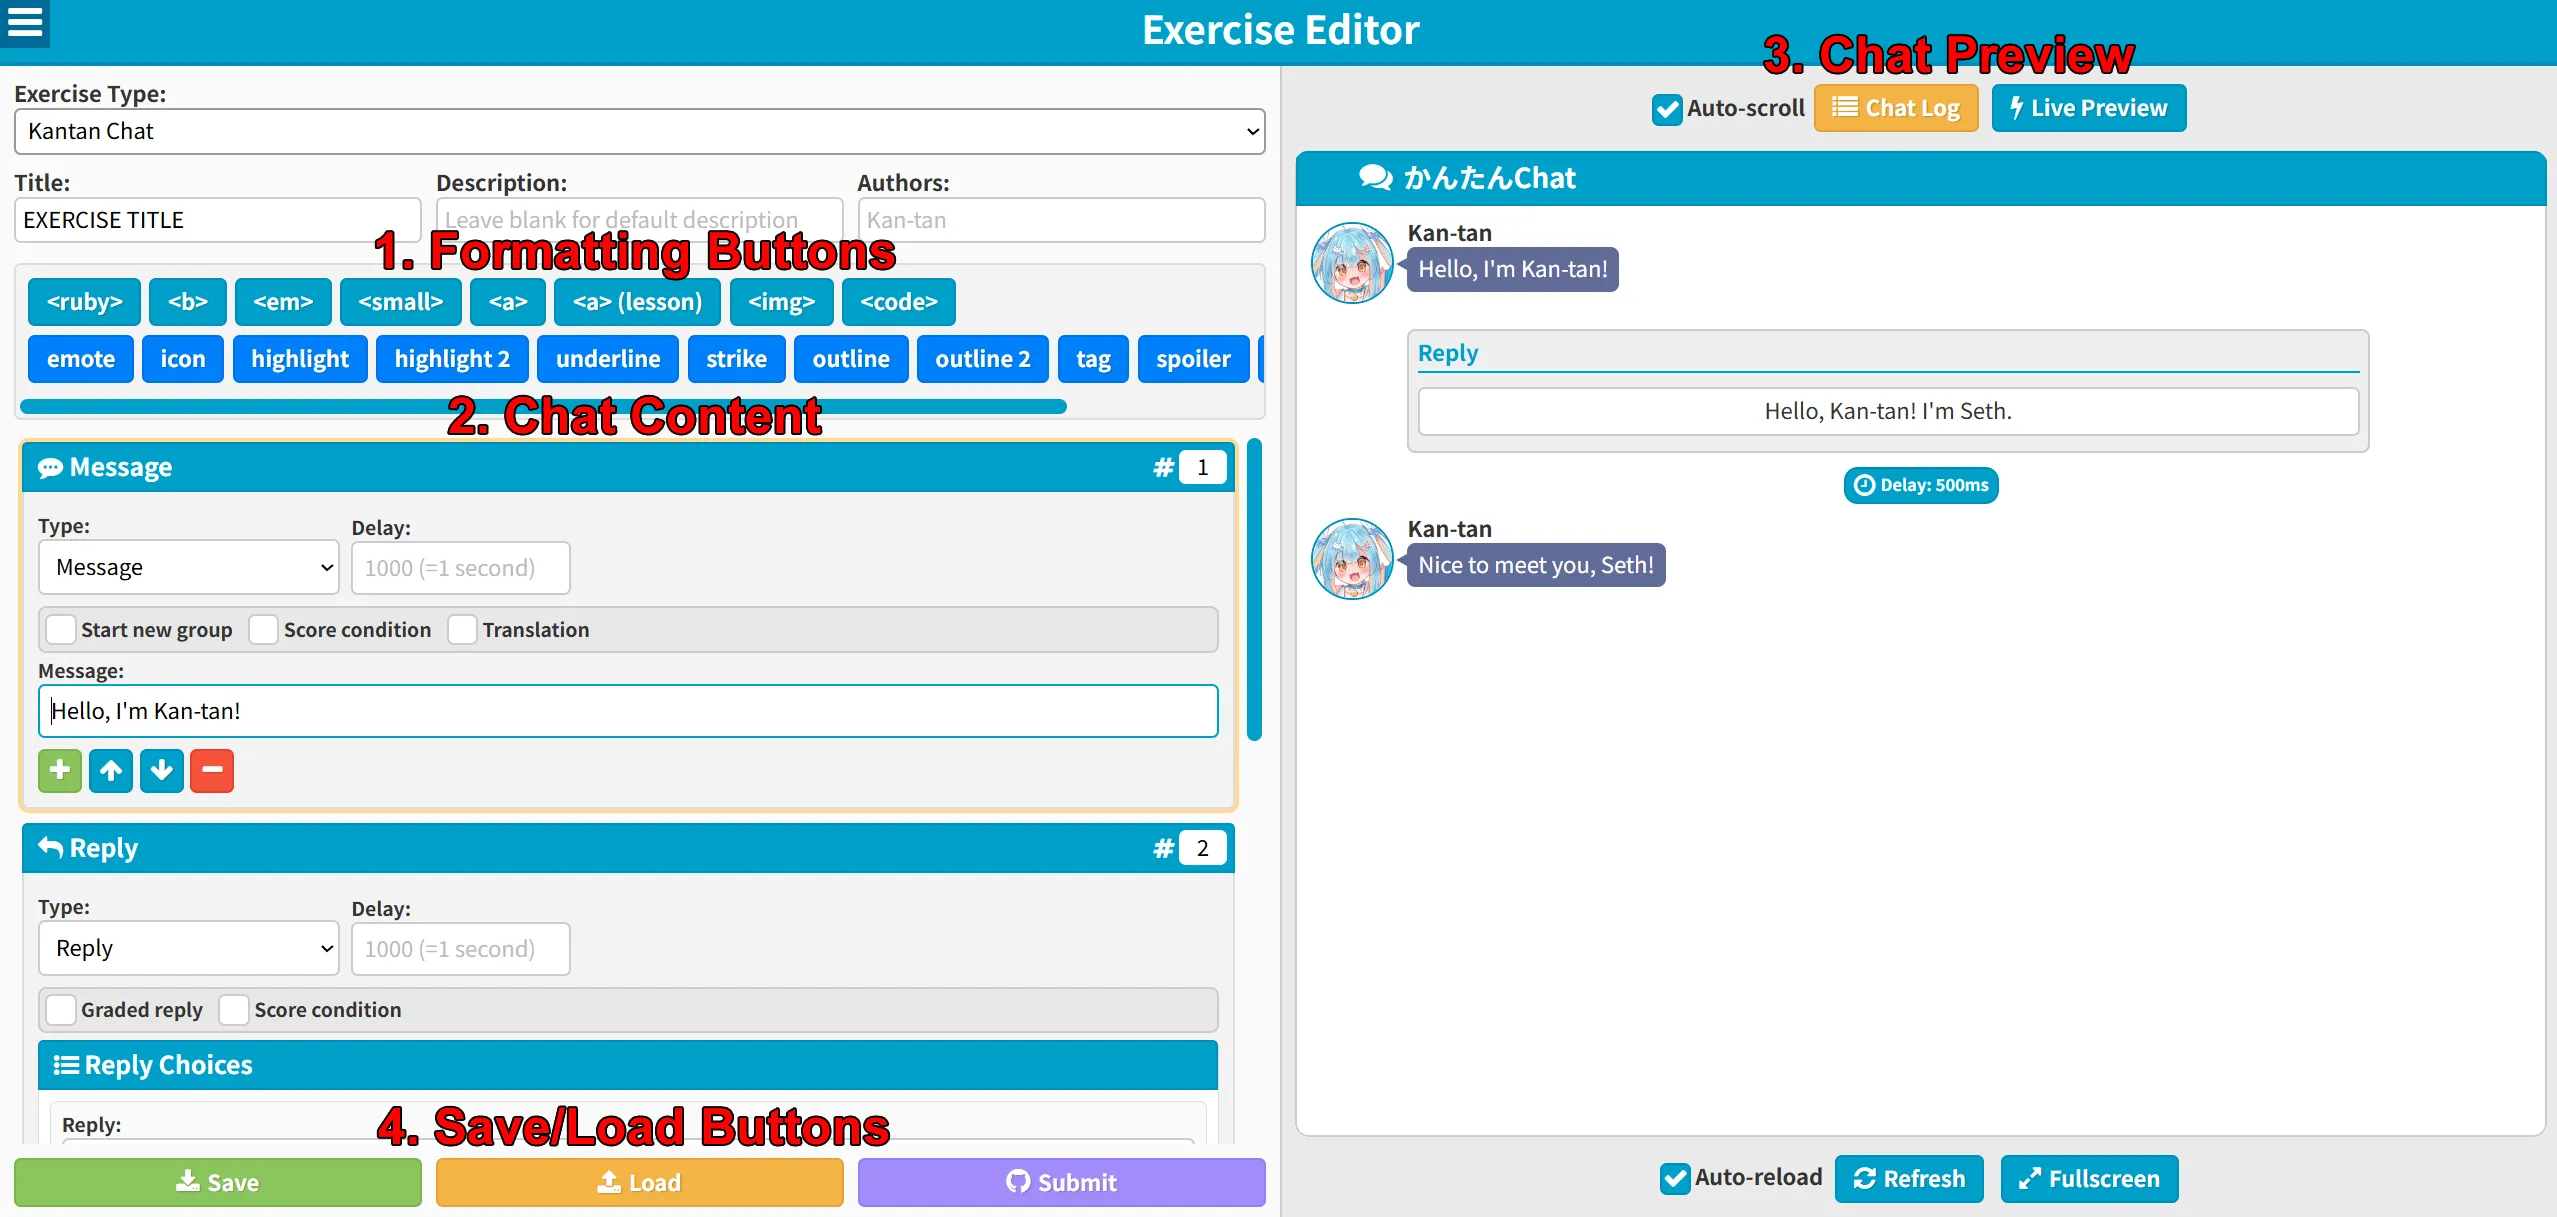
The layout for Kantan Chat is similar to the other editors. This editor is used for creating and generating Kantan Chat exercises which are mainly used for summary exercises and conversation practice. The layout is fairly straightforward:
- You have formatting buttons at the top for inserting tags along with emotes which are unique to the chat exercises.
- This is where you will actually edit the chat. The default block type is a "message" block which are messages sent by Kan-tan. There are also "Reply" blocks used for general replies and answers, "Dely" blocks for creating a pause that delays the next message, "Info" blocks for inserting information into the chat, and more. Any block can be changed using the "Type" selection box. Some other important things to note are:
- Score condition limits the visibility of a message based on the user's total score. For example, if you set it to 4 and the user previously answered all four questions correctly, then they will see this message. But if they don't get four answers correct, they won't see this message.
- Translation is used for showing a translation for messages or replies written in Japanese.
- Start new group is used for separating Kan-tan's messages into a new group to aid with readability and to separate dialogue into sections based on their content.
- Delay is both a type and an option on all blocks. The option on the message blocks in particular is used to alter how long it takes for Kan-tan's next message to show up. If a previous message had a lot of text, I recommend setting the delay to 2000-4000 or more to give the user more time to read before the next message appears.
- Graded reply on reply blocks sets a reply as an answer block. This means that choosing a reply on this block will affect the user's exercise score. When doing this, ALWAYS ensure that there is at least one reply with the Correct answer box ticked otherwise all replies will be marked wrong.
- Branching dialogue on replies allows you to set dialogue that only appears AFTER selecting this specific reply.
- Kantan Chat offers two preview options. The "Chat Log" shows a pre-rendered example of how the chat will look which is ideal for editing and the "Live Preview" is like the other editor's previews that let's you actually try out the exercise which is ideal for testing.
- And last but not least are the buttons for saving and loading your chat exercises. Always remember to save them when you're done editing so you don't lose your progress!
Editor Shortcuts
We have a number of shortcuts and tricks you can use to make editing a breeze.
| Action | Command |
| Quick Wrap | Select any text in the editor, then click a button or press a shortcut to wrap that text with HTML tags. This also works for wrapping text with: "", '', (), {}, and [] by pressing their respective opening keys. |
| Multi-Edit | Hold CTRL and click lines in the editor to select multiple lines. Once selected, you can type to edit all of the selected lines at once. |
| Duplicate | Press CTRL+D to duplicate or "clone" a line or selected chunk of text. |
| Undo | Press CTRL+Z to undo what you've written. |
| Redo | Press CTRL+Y to redo what you've previously undone with CTRL+Z. |
| Cut | Press CTRL+X to cut a selected line or chunk of text. |
| Save | Press CTRL+S to save your exercise file. |
| <ruby> | Press CTRL+ALT+T to quick insert <ruby> tags. |
| <b> | Press CTRL+ALT+B to quick insert <b> tags. |
| <em> | Press CTRL+ALT+E to quick insert <em> tags. |
| <a> | Press CTRL+ALT+A to quick insert <a> tags. |
| <img> | Press CTRL+ALT+I to quick insert <img> tags. |
| <p> | Press CTRL+ALT+M to quick insert <p> tags. |
| <br> | Press CTRL+ALT+N to quick insert a <br>. |
| Center | Press CTRL+ALT+C to quick insert Center tags. |
| Highlight | Press CTRL+ALT+H to quick insert highlight tags. |
| Underline | Press CTRL+ALT+U to quick insert underline tags. |
| Strike | Press CTRL+ALT+S to quick insert strike tags. |
| Outline | Press CTRL+ALT+O to quick insert Outline tags. |
| Spoiler | Press CTRL+ALT+Q to quick insert spoiler tags. |
If you forget any of these shortcuts, you can hover over the buttons in the toolbar to see them again.
Testing Your Exercise
If you would like to test your exercise to see how it would look on Kantan Japanese outside of the preview, this section will teach you how to do that!
- Firstly, download the offline version of Kantan Japanese from GitHub by clicking here.
- Unzip the archive's contents wherever you like.
- Navigate to
lessons/lesson-0/and create a new folder named whatever you like, such astest. - Drag and drop your exercise file into this folder and double click it to open it in your browser.
That's it! If you did everything correctly, your exercise should now be displayed on the offline version of our website. The name of the file on the offline version doesn't matter, unless you're trying to integrate it into the website, such as via a link, exercise list, etc. In which case, the file should be named index.html.
Submitting your Exercises or Revisions
If you're reading this, then you're probably finished creating an exercise or revising one. So, what's next? Why, submitting it to our GitHub repository for review, of course! There are two ways that you can do that: 1. by sending us your exercise/revision via GitHub Issues (easy) or 2. by submitting a pull request with your exercise/revision (more technical/difficult). Please choose the method that you prefer below!
Submitting via GitHub Issues
To submit your exercise/revision for review, please follow the steps below:
- To start, you first need to create a GitHub account, if you don't have one yet.
- Once you've created your account, open a new issue in our repository.
- Give the issue a relevant title, such as "[Exercise Submission] TITLE" or "[Exercise Revision] TITLE" so our maintainers know at a glance what your issue is about.
- Next, in the textarea, let us know a bit about what you're submitting, if you like. If it's a revision, let us know what you changed or added. If it's a new exercise, let us know a bit about what it tests students on and where you might like us to put it.
- Finally, attach your Exercise file to the issue, by dragging it into the textarea or clicking the "add files" button below the textarea.
- Review everything one last time, and if you're happy, click create to submit your exercise/revision for review.
If everything looks good, we'll add your exercise/revision to our website!
Submitting via Pull Request
Submitting via PR requires a bit more work, but if you'd like to do that, please follow the steps below:
- To start, you first need to create a GitHub account, if you don't have one yet.
- Once you've created your account, navigate to our repository and fork it. (Click here to learn about forking)
-
Once forked, you can edit any of the files in your forked version of our repository. From here, things change a bit depending on what you're doing:
- If you're revising an exercise, navigate to where that exercise is and edit it. You should see a
<script>Kantan.generateQuiz({tag. Delete everything inside of this and replace it with the contents in your exercise file. - If you're adding a new exercise, navigate to the folder you'd like your file to be, such as
lessons/user-submitted/and create a new folder, such asexercise-10. Then, inside of this newly created folder, place your exercise file here and rename it toindex.html.
- If you're revising an exercise, navigate to where that exercise is and edit it. You should see a
- When you're finished, click Commit changes to save them. (Ignore this if not using the web interface)
- [Optional] If you would like to also handle integrating your exercise into the website, click here for additional steps.
- Now, the next step is to make a pull request in our repository. (Click here to learn about pull requests)
- Give the PR a relevant title, such as "[Exercise Submission] TITLE" or "[Exercise Revision] TITLE" so our maintainers know at a glance what your PR is about.
- Let us know what you changed or added in your PR in the textarea.
- Review everything one last time, and if you're happy, submit your PR for review.
If everything looks good, we'll add your exercise/revision to our website!
Integrating an Exercise (Optional)
Our maintainers usually handle the more technical matters of integrating your exercise into the website, but if you're interested in going the extra mile, these are the additional steps required for integrating an exercise into the website.
- Edit the
index.htmlfile for your exercise and replace{PATH_TO_PAGE}with the path that your exercise resides in, such aslessons/lesson-0/exercise-10/, for example. - Update
lesson-list.jswith a link to the exercise. For example, if it goes in Lesson 0, add an entry for it to lesson 0, such as'lesson-0/exercise-10|EXERCISE TITLE',. The syntax for a link in this file is pretty straightforward:'PATH_TO_EXERCISE|EXERCISE_TITLE'. - Update
sitemap.xmlwith the exercise link. Find the lesson it belongs to and include it where it would fit. The syntax for this is simple:<url><loc>https://sethclydesdale.github.io/kantan-japanese/lessons/lesson-0/exercise-10/</loc></url>, just copy the link to the exercise and paste it between the tags. - Update the
index.htmlin the root of/lessons/with a link to the exercise. Again, find the lesson and where your exercise fits and add a link for it. The syntax is your usual HTML anchor links and list elements:<li><a href="lesson-0/exercise-10/">EXERCISE_TITLE</a></li>. - [Optional] Test your changes. See the testing section if you want to test your changes. Mainly, you're just downloading your fork of the repository to test offline. Open the homepage/etc. and see if your links are all working properly.
That's it! Now just return to Step 6 and submit a PR as normal.
Help
If you're confused or having trouble submitting your exercise/revision, don't be afraid to reach out and ask us for help. Click the button below to learn how to get in contact with us!