Do you want to make a revision to one of our articles or create an entirely new one? If so, read on to learn how!
Creating New Articles
If you would like to create an entirely new article for our courses or grammar resources, please contact us via one of the options here first, to let us know about your proposal so that we can review it. Include the following information:
- Let us know what the article is about. For example, a grammar point, cultural topic, etc.
- If you think it would fit well somewhere in our courses or website, let us know where you'd like this article to appear.
If after reviewing your proposal we think that it would fit well on Kantan Japanese, we'll give you the green light to begin writing it! If not, we'll let you know why. We ask you to contact us first, because we don't want you to write up an entire article for our courses only for it to be denied.
Of course, if you'd like to write up an article without contacting us, you're more than welcome to. Submitted articles that don't fit in our course or grammar resources can still land a spot in our user-submitted articles section if they hold educational value.
Writing your Article
For writing articles, you'll require an understanding of the following:
- Japanese (at least N3)
- HTML
It's extremely important that you understand Japanese if you're going to be teaching anything about it. HTML on the otherhand is simply required for formatting your article. We have a toolbar for inserting formatting elements, so even if you don't know HTML you shouldn't have too much trouble. Still, we suggest reading up on HTML a bit just to understand how it works! We'll go over it more during the editor formatting section.
Now, if you're ready to start writing your article, click here to learn how to use our Article Editor so you can get writing!
Revising Articles
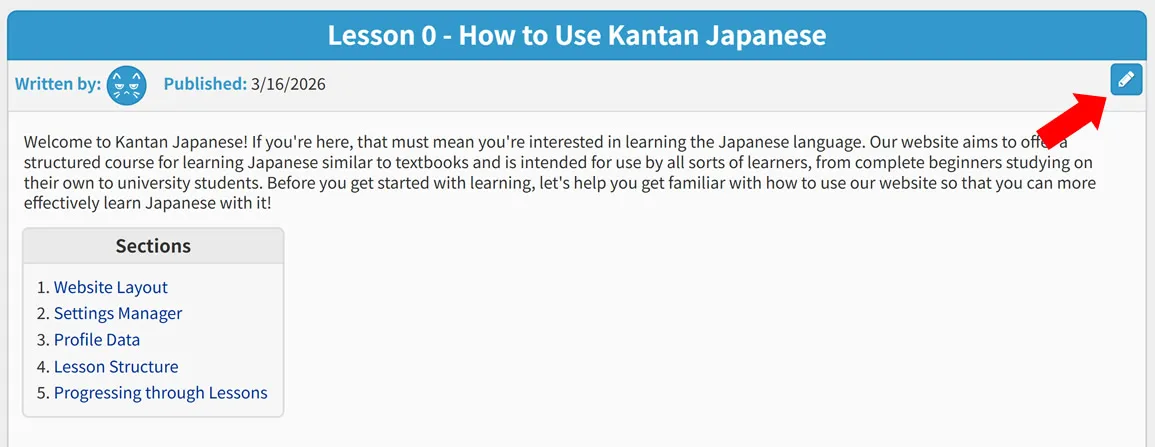
If you notice a typo or would like to add more information to an article, click the button in the top right corner of the article to edit it. This will open the article in our editor. If you're new to our Article Editor, please see the next section below to learn how to use it!
How to Use the Article Editor
Before you create or edit any articles, let's get you familiar with our Article Editor! For writing and editing articles on Kantan Japanese, we have a dedicated editor that you can use. Click the button below to open it up! You can also click the button in the top right of articles to open them in the editor.
Article Editor Layout
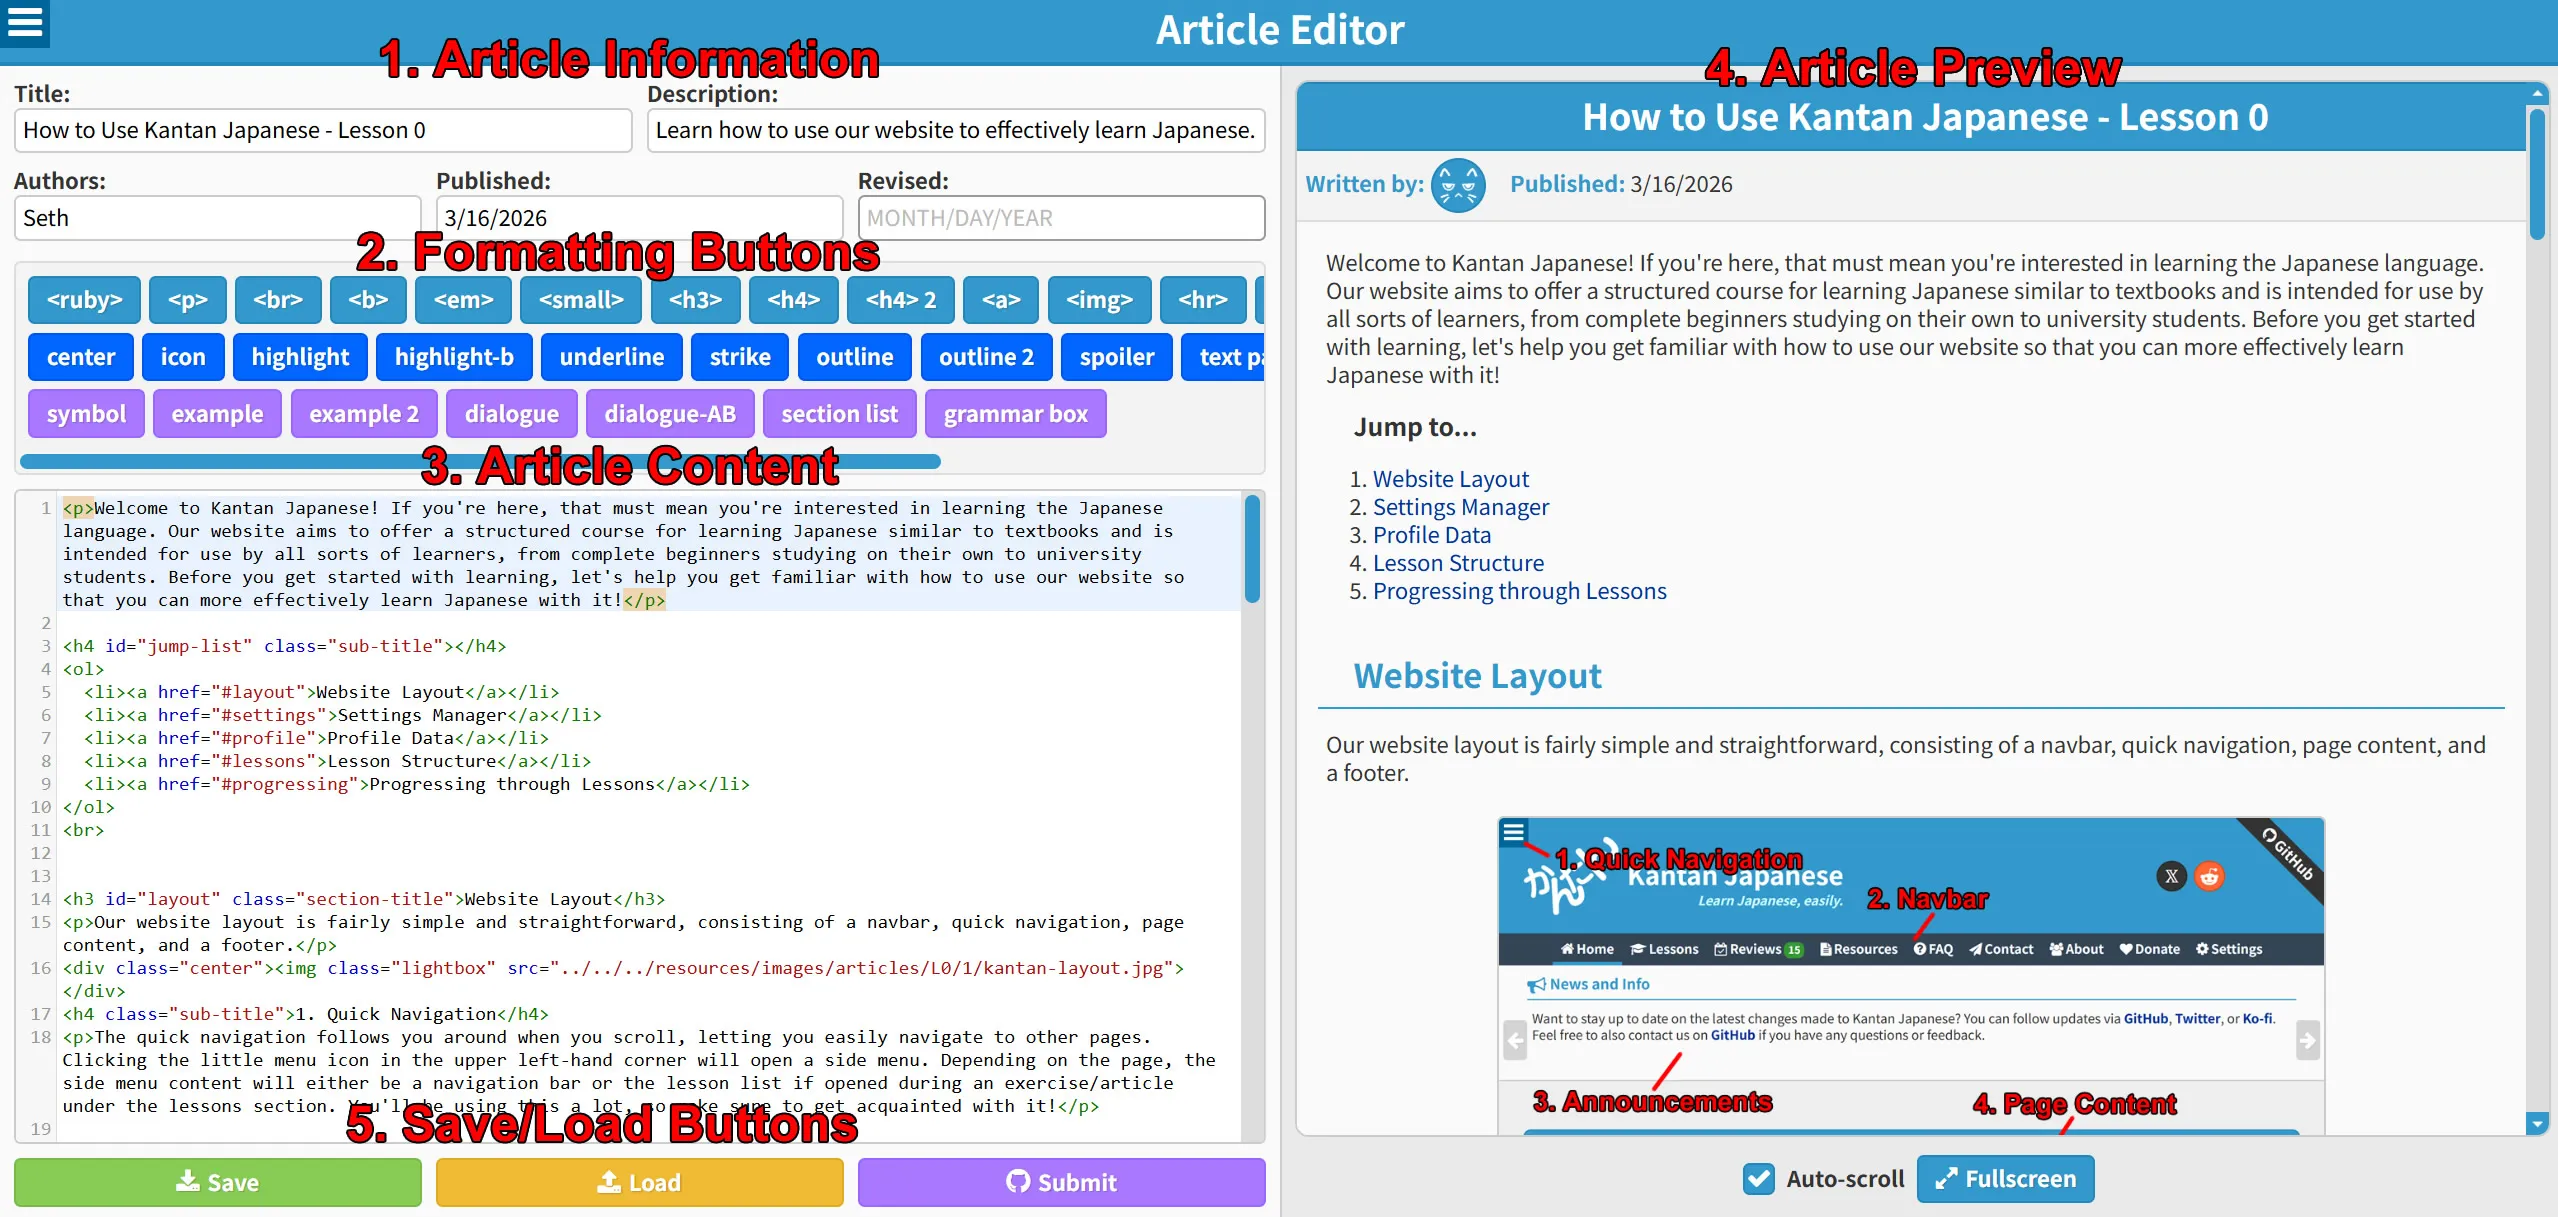
You should see something like the image below once you've opened the Article Editor.
-
This area consists of the article's meta data, such as the page title, description, publish/revision date, and authors.
- Title: Here you would insert the title for your article. Whatever your article is about, try to sum it up here!
- Description: The description is not shown on the page, but IS shown when searching the web. Give a brief summary about your article here.
- Published: This is the date your article was published. When you're done writing an article, sign the date you finished it here!
- Revised: This is the date the article was updated. If you edit an article for submission, make sure you sign the date you revised it here!
- Authors: This is where the list of authors for an article goes. Normally there's only one, but if someone makes considerable contributions to an article we will add them to the list. Multiple authors should be separated by a comma, like so:
Seth, Kan-tan, Mishy. If you're writing your own article, make sure to sign your name here!
- This is the editor toolbar. All of these buttons are for inserting HTML elements into your article to format your content, such as inserting headings, highlighting text, and more. (Please see this website if you're new to HTML)
- This big textarea is where you will be writing your article. This will be a mix of text and HTML as previously mentioned. If you don't know HTML, you can click the previous link above or just learn by example by examining our published articles or experimenting with the formatting buttons.
-
To the right is a big preview of what your article will look like. As you type, it will automatically update. Any elements you click in the editor will also be highlighted and jumped to in the preview so you don't have to keep scrolling around to find what you just added in the preview. You can also click elements in the preview to find them in the editor.
Of course, if you don't like the preview/editor jumping around, you can disable this feature by unchecking Auto-scroll below the preview window. Also, if you need to get a better look at the preview, click the Fullscreen button below it to switch to the fullscreen preview mode. -
When you're finished or want to take a break, click the Save button (or press
CTRL+S) to save your progress. You can also use the Load button (or drag and drop the HTML file into the textarea) to load an article into the editor. If you're ready to submit your article to GitHub, click the Submit button which will take you to our instructions for submitting your article/revisions to GitHub.
※ Please note that the file does NOT have to be named index.html. You can name it whatever you like, but remember to keep the.htmlextension.
Saving Progress
When using the Article Editor, your progress can be saved in two ways:
- Whenever you type in the editor, your progress is saved automatically to the browser. Please note, however, that if you edit another article, your currently saved article will be overwritten. So make sure to manually save the article you were working on using the method below!
- You can manually save articles locally to your computer by clicking the Save button or by pressing
CTRL+S. This will download an HTML file that you can load into the editor at any time. Try to make a habit of manually saving your progress with this button every so often whenever you're working on articles so that you don't lose your progress!
The HTML file output by the Save button is also how you will send us your article or revisions. So always remember to save your article when you're finished with it. By default, if no title is written, the file name will be index.html. While this is fine, it's a good habit to name it something memorable so that you don't overwrite it by accident and know what the contents of the article are at a glance.
Article Formatting
We format the articles on Kantan Japanese using HTML. If you're not familiar with HTML, you can learn about it here. Our formatting is pretty simple and straightforward overall though, so even if you don't know HTML you can get by just using the formatting buttons in our editor. Here are some tips for formatting articles:
-
Start major sections with
<h3 class="section-title">TITLE HERE</h3>tags. - Start sub-sections with
<h4 class="sub-title">TITLE HERE</h4>tags. - Wrap blocks of text or paragraphs in
<p>YOUR TEXT HERE</p>tags. - You can center content using
<div class="center">YOUR TEXT HERE</div>or by addingclass="center"to<p>or other elements. - Use
<br>or<hr>to add spacing or separation between content. - Links can be inserted by using the
<a href="URL">LINK TEXT</a>tags and place your link where URL is. You can optionally open a link in a new tab by adding thetarget="_blank"attribute after href but before the closing ">". - To link or "jump" to certain sections, apply the
id=""attribute to a heading, like this:<h3 id="section-1" class="section-title">Section 1</h3>and then reference that ID in a link<a href="#section-1">Jump to Section 1</a>. Clicking this link will immediately jump the reader to Section 1. -
Images can be inserted by using the
<img class="lightbox" src="IMAGE_URL">tag and placing your image link where IMAGE_URL is. You can optionally control the size of the image with thewidth="NUMBER"attribute by putting a number such as 100 where NUMBER is. Thelightboxclass enables images to be opened in our popup window. This class also adds a border around the image, so if you don't want that, change the class toclass="lightbox no-border"to remove the border.
All of our images are hosted locally in the repo, so you can also include these images by referencing a file from../../../resources/images/. If you're embedding an image outside of our repo, you can use a host like imgur to include your images. We'll later import these images into our repo so that they can be viewed in our offline version.
To give you an example, this is how I sometimes format an article:
            <h3 id="section-1" class="section-title">Section 1</h3>

            <p>Paragraph 1</p>


            <div class="center"><img class="lightbox" src="../../resources/images/articles/other/article-layout.webp"></div>


            <p>Paragraph 2</p>


            <h3 id="section-2" class="section-title">Section 2</h3>

            <p>Paragraph 3</p>


            <h4 class="sub-title">Sub Section</h4>

            <p>Paragraph 4</p>
Feel free to use this as a template to get started or any of our other articles on the website!
Editor Shortcuts
We have a number of shortcuts and tricks you can use to make editing a breeze.
| Action | Command |
| Quick Wrap | Select any text in the editor, then click a button or press a shortcut to wrap that text with HTML tags. This also works for wrapping text with: "", '', (), {}, and [] by pressing their respective opening keys. |
| Multi-Edit | Hold CTRL and click lines in the editor to select multiple lines. Once selected, you can type to edit all of the selected lines at once. |
| Duplicate | Press CTRL+D to duplicate or "clone" a line or selected chunk of text. |
| Undo | Press CTRL+Z to undo what you've written. |
| Redo | Press CTRL+Y to redo what you've previously undone with CTRL+Z. |
| Cut | Press CTRL+X to cut a selected line or chunk of text. |
| Save | Press CTRL+S to save your article file. |
| <ruby> | Press CTRL+ALT+T to quick insert <ruby> tags. |
| <b> | Press CTRL+ALT+B to quick insert <b> tags. |
| <em> | Press CTRL+ALT+E to quick insert <em> tags. |
| <a> | Press CTRL+ALT+A to quick insert <a> tags. |
| <img> | Press CTRL+ALT+I to quick insert <img> tags. |
| <p> | Press CTRL+ALT+M to quick insert <p> tags. |
| <br> | Press CTRL+ALT+N to quick insert a <br>. |
| Center | Press CTRL+ALT+C to quick insert Center tags. |
| Highlight | Press CTRL+ALT+H to quick insert highlight tags. |
| Underline | Press CTRL+ALT+U to quick insert underline tags. |
| Strike | Press CTRL+ALT+S to quick insert strike tags. |
| Outline | Press CTRL+ALT+O to quick insert Outline tags. |
| Spoiler | Press CTRL+ALT+Q to quick insert spoiler tags. |
If you forget any of these shortcuts, you can hover over the buttons in the toolbar to see them again.
Testing Your Article
If you would like to test your article to see how it would look on Kantan Japanese outside of the preview, this section will teach you how to do that!
- Firstly, download the offline version of Kantan Japanese from GitHub by clicking here.
- Unzip the archive's contents wherever you like.
- Navigate to
lessons/lesson-0/and create a new folder named whatever you like, such astest. - Drag and drop your article file into this folder and double click it to open it in your browser.
That's it! If you did everything correctly, your article should now be displayed on the offline version of our website. The name of the file on the offline version doesn't matter, unless you're trying to integrate it into the website, such as via a link, exercise list, etc. In which case, the file should be named index.html.
Submitting your Articles or Revisions
If you're reading this, you're probably finished writing an article or revising one. So, what's next? Why, submitting it to our GitHub repository for review, of course! There are two ways that you can do that: 1. by sending us your article/revision via GitHub Issues (easy) or 2. by submitting a pull request with your article/revision (more technical/difficult). Please choose the method that you prefer below!
Submitting via GitHub Issues
To submit your article/revision for review, please follow the steps below:
- To start, you first need to create a GitHub account, if you don't have one yet.
- Once you've created your account, open a new issue in our repository.
- Give the issue a relevant title, such as "[Article Submission] TITLE" or "[Article Revision] TITLE" so our maintainers know at a glance what your issue is about.
- Next, in the textarea, let us know a bit about what you're submitting, if you like. If it's a revision, let us know what you changed or added. If it's a new article, let us know a bit about what it's about and where you might like us to put it.
- Finally, attach your Article file to the issue, by dragging it into the textarea or clicking the "add files" button below the textarea.
- Review everything one last time, and if you're happy, click create to submit your article/revision for review.
If everything looks good, we'll add your article/revision to our website!
Submitting via Pull Request
Submitting via PR requires a bit more work, but if you'd like to do that, please follow the steps below:
- To start, you first need to create a GitHub account, if you don't have one yet.
- Once you've created your account, navigate to our repository and fork it. (Click here to learn about forking)
-
Once forked, you can edit any of the files in your forked version of our repository. From here, things change a bit depending on what you're doing:
- If you're revising an article, navigate to where that article is and edit it. You should see a
<div class="content-block reading-material loading">tag. Delete everything inside of this and replace it with the contents in your article file. - If you're adding a new article, navigate to the folder you'd like your file to be, such as
lessons/lesson-0/and create a new folder, such asarticle-10. Then, inside of this newly created folder, place your article file here and rename it toindex.html.
- If you're revising an article, navigate to where that article is and edit it. You should see a
- When you're finished, click Commit changes to save them. (Ignore this if not using the web interface)
- [Optional] If you would like to also handle integrating your article into the website, click here for additional steps.
- Now, the next step is to make a pull request in our repository. (Click here to learn about pull requests)
- Give the PR a relevant title, such as "[Article Submission] TITLE" or "[Article Revision] TITLE" so our maintainers know at a glance what your PR is about.
- Let us know what you changed or added in your PR in the textarea.
- Review everything one last time, and if you're happy, submit your PR for review.
If everything looks good, we'll add your article/revision to our website!
Integrating an Article (Optional)
Our maintainers usually handle the more technical matters of integrating your article into the website, but if you're interested in going the extra mile, these are the additional steps required for integrating an article into the website.
- Edit the
index.htmlfile for your article and replace{PATH_TO_PAGE}with the path that your article resides in, such aslessons/lesson-0/article-10/, for example. - Update
lesson-list.jswith a link to the article. For example, if it goes in Lesson 0, add an entry for it to lesson 0, such as'lesson-0/article-10|ARTICLE TITLE',. The syntax for a link in this file is pretty straightforward:'PATH_TO_ARTICLE|ARTICLE_TITLE'. - Update
sitemap.xmlwith the article link. Find the lesson it belongs to and include it where it would fit. The syntax for this is simple:<url><loc>https://sethclydesdale.github.io/kantan-japanese/lessons/lesson-0/article-10/</loc></url>, just copy the link to the article and paste it between the tags. - Update the
index.htmlin the root of/lessons/with a link to the article. Again, find the lesson and where your article fits and add a link for it. The syntax is your usual HTML anchor links and list elements:<li><a href="lesson-0/article-10/">ARTICLE_TITLE</a></li>. - [Optional] Test your changes. See the testing section if you want to test your changes. Mainly, you're just downloading your fork of the repository to test offline. Open the homepage/etc. and see if your links are all working properly.
That's it! Now just return to Step 6 and submit a PR as normal.
Help
If you're confused or having trouble submitting your article/revision, don't be afraid to reach out and ask us for help. Click the button below to learn how to get in contact with us!